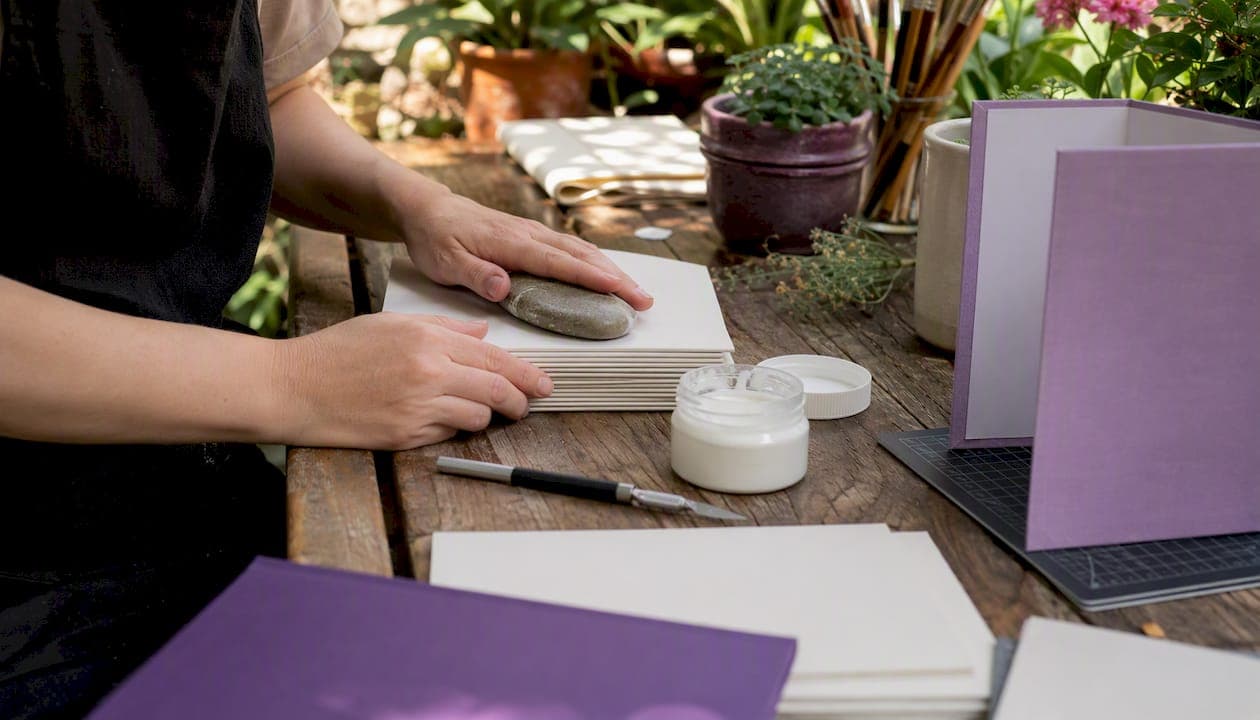
Yes, you can make a durable hardcover book at home, and the results can genuinely rival low-end commercial editions if you follow the right sequence. Two routes work for most home projects: (A) sewn signatures cased into boards, which produces the most durable, lay-flat result and is the right choice for a keepsake or short run of one to five copies; and (B) a glued text block (perfect or thermal binding) cased into boards, which is faster and works well when you need ten or more copies or have limited time. Both methods use the same hardcover case construction steps. The difference is entirely in how you assemble the interior pages before attaching them to the cover.
How to print a hardcover book at home is a project that rewards patience and preparation more than any special talent. Get the file setup right, print a test signature, and give your glue the full 24 hours it needs, and the finished book will feel solid in your hands.
Key Takeaways
A durable DIY hardcover book at home requires correct file setup, a test signature, and at least 24 hours of pressing time under even weight.
| Point | Details |
|---|---|
| Preflight your PDF first | Set 300 dpi images, embedded fonts, and a minimum 0.75" gutter before printing anything. |
| Always print a test signature | Fold one signature to confirm page order and registration before running the full print job. |
| Choose sewn for durability | Sewn signatures last longer and open flatter than glue-only bindings for keepsake books. |
| Press for 24 hours minimum | PVA glue needs a full 24 hours under even pressure to cure without warping the boards. |
| Adventuresofbook as a faster alternative | A $14.99 print-ready PDF from Adventuresofbook skips file prep and delivers a single-child personalized book in about 5 minutes. |
Table of Contents
- When should you DIY versus use a print-on-demand or professional binder?
- What tools and materials do you need for a home hardcover?
- How do you prepare a print-ready PDF for home booklet printing?
- How do you print at home and make clean signatures?
- How do you bind the text block: sewn signatures or glue?
- How do you round and back the spine?
- How do you cut boards and build the hardcover case?
- How do you case in the text block and finish the book?
- How long does pressing take, and how do you know the binding held?
- What does a DIY hardcover actually cost and how long does it take?
- Pre-production checklist: what to verify before you print a single sheet
- A parent's honest take on handmade books versus buying one
- Want a print-ready file without the layout work?
- Sources
- FAQ
When should you DIY versus use a print-on-demand or professional binder?
Before you buy materials, it helps to be honest about what you actually need. A single handmade hardcover for a child's birthday is a very different project from producing fifteen copies for a family reunion.
DIY makes sense when:
- You want one to five copies of a keepsake book and the handmade quality is part of the gift.
- You have a weekend to spare and enjoy the craft process.
- You already own a reliable home printer and are willing to buy a bone folder, PVA glue, and bookbinding board (total materials cost for a single book typically runs $15–$40 depending on what you already own).
- The book is a personal project, not a product you plan to sell or distribute widely.
A print-on-demand (POD) service or professional binder is the smarter choice when:
- You need more than ten identical copies, because per-unit cost drops sharply at POD services and your time is worth more than the savings.
- You need a specific finish, such as a dust jacket, foil stamping, or a very precise trim size, that home equipment cannot reliably produce.
- You are working with a tight deadline. A single DIY hardcover takes two to four days from printing to final pressing, not an afternoon.
- You have no access to a trimmer or book press, and improvised substitutes (stacked books, scissors) are likely to produce uneven results.
The honest trade-off: a well-made DIY hardcover can look and feel like a real book. But the learning curve on the first attempt is real, and a rushed first book often shows it. If the stakes are high, such as a gift for a milestone birthday or a class project with a deadline, consider a hybrid approach: use a POD service for the printed copy and save the DIY method for a practice run first.
What tools and materials do you need for a home hardcover?
Gather everything before you start. Stopping mid-project to order a missing item is the most common reason a first book stalls.
Paper and printing supplies
- Interior paper: 24–32 lb bond (roughly 90–120 gsm). Lighter paper shows bleed-through on inkjet printers; heavier paper folds cleanly and holds ink well. The minimum recommended weight is 24 lb (90 gsm) for a home-printed text block.
- Endpapers: heavier stock, 60–80 lb text or light cardstock, in a color or pattern that complements your cover.
- Home printer: auto-duplex is a significant time-saver. If yours is manual-duplex only, plan for extra test prints.
Cover and binding materials
- Bookbinding board (binder's board or davey board): 0.098" (2.5 mm) thickness is a good all-around choice for children's books and short-run keepsakes.
- Book cloth or decorative cover paper: book cloth is more forgiving for corners and resists moisture better than plain paper.
- Acid-free PVA glue: the standard adhesive for bookbinding. It dries flexible, which matters for the hinge.
- Mull or super cloth: a thin, open-weave fabric glued to the spine of the text block before casing-in; it adds structural strength.
- Headbands (endbands): optional but give a finished look at the head and tail of the spine.
Tools
- Bone folder: for scoring, folding, and burnishing cloth onto boards without tearing.
- Metal ruler and self-healing cutting mat: for accurate cuts.
- Guillotine or rotary trimmer: scissors produce uneven edges. A rotary trimmer is the minimum; a small guillotine trimmer gives cleaner results on thicker stacks.
- Awl and bookbinding needle: for piercing sewing stations in signatures.
- Waxed linen thread or strong polyester thread: 18/3 or 25/3 weight works well for most home projects.
- Clamps or a book press: two flat boards with heavy books stacked on top work as a substitute press. Dedicated book presses are available for under $50 from craft suppliers.
- Microspatula or palette knife: for spreading glue evenly.
Safety notes
Use a sharp craft knife with a fresh blade and always cut away from your fingers on a stable cutting mat. PVA glue is non-toxic but keep it off book cloth surfaces where it will stain. Clamps can slip; keep fingers clear when tightening.
Pro Tip: Grain direction matters more than most beginners expect. Paper and bookbinding board both have a grain direction, and both should run parallel to the spine. Fold a sheet of paper in both directions: the fold that resists more is against the grain. Boards that run against the grain will warp when glue is applied.
How do you prepare a print-ready PDF for home booklet printing?
Getting the file right before you print a single sheet is where most DIY projects succeed or fail. A PDF with wrong margins or low-resolution images cannot be fixed after printing.
Core PDF specs
| Spec | Recommended setting |
|---|---|
| Image resolution | 300 dpi minimum |
| Color mode | CMYK for inkjet; RGB is acceptable for home laser |
| Fonts | Embedded or converted to outlines |
| Bleed | 0.125" (3 mm) on all edges that reach the trim |
| Gutter margin | Minimum 0.75" from spine edge to text |
| Trim size | Set to your finished page size, not the sheet size |
The 0.75" gutter minimum is not arbitrary. Pages that are sewn or glued lose roughly 0.25"–0.375" of the inner margin to the binding. If your text starts at 0.5" from the spine edge, some of it will disappear into the gutter.
Imposition and signature planning
A signature is a small group of pages (typically 4, 8, or 16 pages) printed on a single sheet, folded together, and nested. For a home printer, 8-page signatures (two sheets of paper, folded to make eight pages) are the most practical because they fold cleanly and keep the spine from bulging.
To lay out printer spreads manually, you need to know the total page count and arrange pages so that when each sheet is folded, the pages fall in the correct reading order. Most booklet-print drivers (Adobe Acrobat's "Booklet" print mode, for example) handle this automatically. If you are doing it manually, the rule is: the outermost sheet of an 8-page signature contains pages 1, 2, 7, and 8; the inner sheet contains pages 3, 4, 5, and 6.
Preflight checklist before printing
- All images are 300 dpi at final print size, not at screen resolution.
- Fonts are embedded (check in Acrobat under File > Properties > Fonts).
- Page size in the PDF matches your intended trim size.
- Bleed extends 0.125" beyond the trim on any edge that bleeds.
- Gutter is at least 0.75" on every page.
- Color mode is correct for your printer type.
Pro Tip: Print one test page at 100% scale and hold it up to a light source. You should be able to see that text and images sit well inside the trim marks and that the gutter is clearly visible. This takes two minutes and catches most layout errors before you waste a full ream of paper.
How do you print at home and make clean signatures?
Printing and folding clean signatures is the step where most first-timers lose time to avoidable errors. A methodical approach here saves the whole project.
Step-by-step printing workflow
- Print a single test signature first. Print just the first 8-page signature (two sheets), fold it, and check that pages fall in the correct order and that the gutter margin is adequate. Do not print the full run until this test passes.
- Set your printer to the correct paper size and scale. Print at 100%, not "fit to page." Scaling even slightly changes your margins and trim size.
- For auto-duplex printers: load paper and let the printer handle both sides. After printing, check that the front and back of each sheet align (hold it up to a window). Misalignment of more than 1/16" will show as a registration problem when folded.
- For manual-duplex printers: print all odd pages first, then reload the stack in the correct orientation for even pages. The correct reload orientation depends on your specific printer model; run a single test sheet with a pencil mark on one corner before committing to the full run.
- Sort sheets into signature groups as they come off the printer. Keep them in order; shuffling a mixed stack is tedious and error-prone.
- Fold each signature with a bone folder. Fold one sheet at a time, aligning edges carefully, then run the bone folder along the fold to sharpen it. Nest the sheets of each signature together.
- Stack all signatures in reading order and clip them loosely together while you prepare for sewing or gluing.
Pro Tip: Paper grain runs parallel to the spine in a well-made book. When you fold a sheet, the fold that runs with the grain will feel smooth and spring back slightly. The fold against the grain will feel stiff and may crack the paper surface over time. Always orient your sheets so the grain runs head-to-tail (parallel to the spine) before printing.
How do you bind the text block: sewn signatures or glue?
The text block is the stack of printed, folded signatures before any cover is attached. How you hold it together determines how long the book lasts and how well it opens. Sewn signatures produce more durable results; glue-based methods are faster but less forgiving of heavy use.
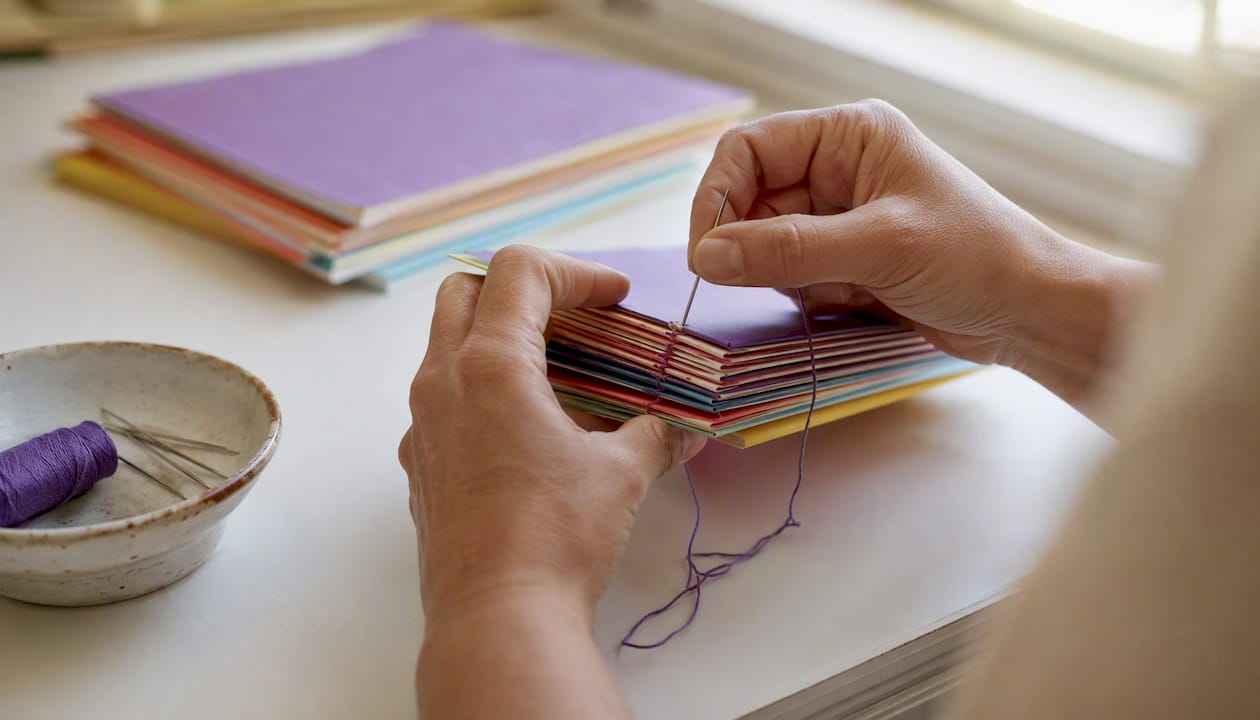
Sewn signatures (recommended for keepsakes)
The kettle stitch and French link stitch are the two most common patterns for home bookbinding. Both work by sewing through the fold of each signature and linking to the previous one.
Basic sewing sequence:
- Mark sewing stations along the spine fold of each signature: one station 0.5" from the head, one 0.5" from the tail (these become the kettle stitches), and two to four evenly spaced stations in between.
- Pierce all stations with an awl before threading the needle.
- Sew the first signature from the inside out, then link each subsequent signature to the previous one at the kettle stitch points.
- Pull thread firmly but not so tight that it tears the paper. Consistent tension across all signatures is what keeps the spine square.
- After the last signature, tie off with a square knot and trim the thread close.
- Glue a strip of mull (open-weave cloth) over the entire sewn spine with PVA, extending about 0.75" onto the first and last signature. This reinforces the connection between the text block and the case.
Glue-based (perfect binding) approach
Perfect binding is faster and requires no sewing, but the result is less durable and does not open as flat.
- Fan the pages slightly and apply a thin, even coat of PVA glue to the spine edge. Let it tack for two minutes, then apply a second coat.
- While the glue is still slightly tacky, press a strip of mull or kraft paper over the spine for reinforcement.
- Clamp the text block between two boards and let it dry for at least 24 hours before casing-in.
Pros and cons at a glance:
- Sewn: durable, opens flat, repairable, takes 60–90 minutes of active work per book.
- Glued: faster (20–30 minutes active), adequate for low-use copies, harder to repair if pages start to pull free.
Pro Tip: Wax your thread before sewing by running it across a block of beeswax or a plain white candle. Waxed thread slides through paper more smoothly, tangles less, and adds a small amount of moisture resistance to the spine.
How do you round and back the spine?
Rounding and backing are optional steps that give a hardcover book its characteristic curved spine and raised shoulder at the hinge. They are worth doing for a keepsake; they are not strictly necessary for a flat-back binding.
What rounding and backing actually do
Rounding pushes the spine into a slight convex curve, which distributes the stress of opening across more pages and prevents the spine from collapsing inward over time. Backing creates a small shoulder on each side of the spine that the cover boards rest against, making the hinge stronger and the book easier to open.
For a flat-back binding (simpler, acceptable for thin books under 0.5" thick or for a more modern aesthetic), skip both steps. Flat-back bindings are common in children's picture books and work well for short page counts.
Light rounding sequence
- After the mull has dried on the sewn spine, clamp the text block between two boards in a vise or book press with the spine exposed.
- Using a bone folder or a smooth-faced hammer, gently push the top third of the spine away from you, then the bottom third, working gradually toward a slight curve. You are aiming for a curve of roughly 1/8" to 3/16" for a typical children's book.
- Apply a thin coat of PVA to the rounded spine to set the shape. Let it dry under light pressure.
- Back the spine by placing the text block on a flat surface and using the bone folder to push the top few pages on each side outward, forming the shoulder. This step requires a book press or vise for best results.
When to skip it:
- The text block is under 0.5" thick.
- You prefer a clean, flat-back aesthetic.
- You are making a practice book and want to simplify the process.
How do you cut boards and build the hardcover case?
The hardcover case is the shell that wraps around the text block. Getting the measurements right is the single most important step in case construction. A case that is too tight will resist opening; one that is too loose will look sloppy.
Measurement formulas
- Board height: text block height + 0.125" (3 mm) overhang top and bottom = text block height + 0.25" total.
- Board width: text block width + 0.125" (3 mm) overhang on the fore-edge = text block width + 0.125".
- Spine board width: measured directly from the spine of the finished, pressed text block. Do not estimate; measure with calipers or a ruler after pressing.
- Hinge gap (joint): 0.1875" (about 3/16") between each cover board and the spine board. This gap is what allows the cover to open without straining the hinge.
Cutting and covering steps
Cutting boards, covering with cloth, and folding corners follow a consistent sequence:
- Cut both cover boards and the spine board to size with a metal ruler and sharp craft knife on a cutting mat.
- Cut your book cloth or cover paper to size: board height + 1.25" (to allow 0.625" turn-in on all edges) by total case width (both boards + spine board + two hinge gaps) + 1.25".
- Lay the cloth face-down. Position the spine board in the center, then place each cover board with the 3/16" hinge gap on each side.
- Apply PVA evenly to the back of the boards (not the cloth) and press them into position.
- Trim the corners of the cloth at 45°, leaving about 1.5x the board thickness at each corner so the turn-in covers the corner cleanly.
- Fold and burnish the turn-ins with a bone folder, starting with the long sides, then the short sides.
Pro Tip: Apply glue to the boards, not the cloth. Cloth absorbs glue unevenly and can stretch or bubble if it gets too wet. Gluing the board surface and pressing the cloth onto it gives you more control and a flatter result.
Headcaps and spine lining
After the case is assembled, line the inside of the spine board with a strip of mull or kraft paper cut to the spine width. This reinforces the spine and gives the endpapers something solid to adhere to during casing-in. Headcaps (the small folded cloth at the head and tail of the spine) are formed by pinching the cloth at each end of the spine board and pressing it into shape with a bone folder while the glue is still slightly tacky.
How do you case in the text block and finish the book?
Casing-in is the step where the text block meets the cover. Done carefully, it produces a book that opens cleanly and lies flat. Rushed, it produces a book with visible glue bleed, warped boards, or a hinge that cracks on the first opening.
Casing-in sequence
- Apply a thin, even coat of PVA to the outer face of the front endpaper (the sheet glued to the first signature).
- Align the text block inside the case: the spine of the text block sits against the spine board, and the overhang at head, tail, and fore-edge is equal on all sides (roughly 0.125" all around).
- Press the front board down firmly onto the glued endpaper. Run your fingers from the spine outward to push out any air bubbles.
- Open the case, flip the book over, and repeat for the back endpaper.
- Close the book and place it under even pressure immediately. Slip a sheet of wax paper between each endpaper and the adjacent page to prevent glue from bonding pages together.
- Press for at least 24 hours.
Trimming
If your pages need trimming after casing-in, use a guillotine trimmer rather than a rotary cutter for stacks thicker than 0.25". Trim no more than 0.125" from any edge to avoid cutting into the text area. A professional trimmer at a print shop is worth the small fee if you need a clean, precise cut on the fore-edge.
Final finishing touches
- Endbands: glue a pre-made headband strip at the head and tail of the spine for a polished look.
- Edge treatments: colored or gilded edges require a specialized gilding tool or spray paint and are optional for home projects.
- Quality check: open the book to the center and check that the spine does not crack, the hinge flexes smoothly, and no glue is visible on the page edges.
How long does pressing take, and how do you know the binding held?
Pressing under even weight for 24 hours is the standard expectation for PVA-glued bindings. Cutting that time short is the most common reason a finished book warps or develops a loose hinge within weeks.
Home press alternatives
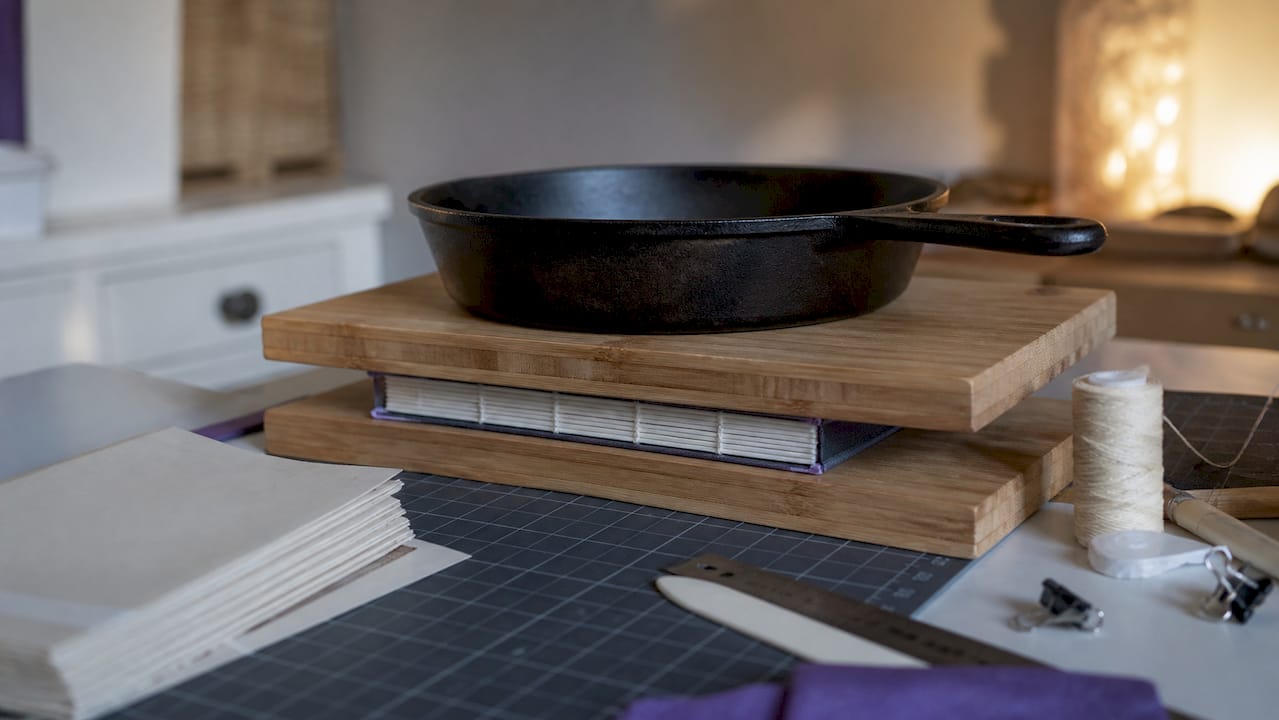
You do not need a dedicated book press to get good results. Stack two flat, rigid boards (MDF or plywood works well) on either side of the book, then pile heavy, evenly distributed weight on top: a stack of hardcover books, a cast-iron skillet, or a filled water jug all work. The key is even pressure across the entire surface. OwnYourBookPress documents this low-cost approach and notes that consistent pressure matters more than the total weight.
Quality checklist
After 24 hours, run through these checks before declaring the book finished:
- Hinge flex: open the cover to 90° and release it. The hinge should flex without cracking or resisting.
- Spine square: lay the book on a flat surface. The spine should be straight, not bowed or twisted.
- No glue bleed: check the first and last pages for any glue that seeped through the endpapers.
- Pages open without cracking: open to the center spread. The spine should flex, not crack at the joint.
- Even overhang: the cover should overhang the text block by roughly 0.125" on all three open edges.
If the hinge cracks, the glue dried before you achieved full contact. If the boards warp, the glue was applied too thickly or unevenly, or pressing was insufficient. Both problems are fixable on a second attempt once you know the cause.
What does a DIY hardcover actually cost and how long does it take?
Transparency here matters. A handmade hardcover is not always cheaper than a POD copy once you factor in your time, and the first book always takes longer than subsequent ones.
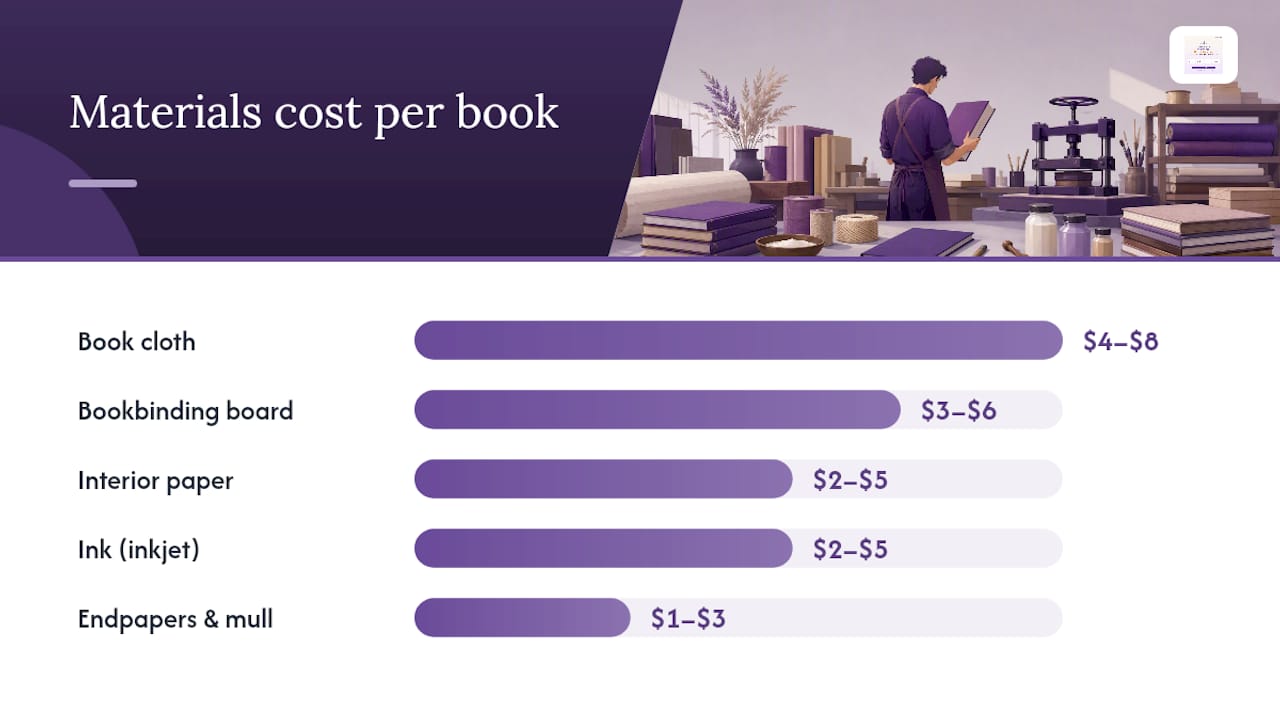
| Item | Estimated cost (single book) |
|---|---|
| Interior paper (50–80 sheets, 24–32 lb bond) | $2–$5 |
| Bookbinding board (two cover boards + spine) | $3–$6 |
| Book cloth (enough for one cover) | $4–$8 |
| Acid-free PVA glue (per-book portion) | $1–$2 |
| Endpapers and mull | $1–$3 |
| Ink (inkjet, per-book estimate) | $2–$5 |
| Total per-book materials | $13–$29 |
One-time tool costs (bone folder, trimmer, awl, needle, thread) add roughly $30–$60 if you are starting from scratch. Those costs amortize across every book you make after the first.
Time estimates for a single book:
- File preparation and preflight: 1–3 hours (longer on the first project).
- Printing and folding signatures: 1–2 hours.
- Sewing the text block: 45–90 minutes.
- Building the hardcover case: 45–60 minutes.
- Casing-in and pressing: 30 minutes active, then 24 hours drying.
- Total active time: 4–7 hours spread over two days minimum.
Difficulty rating: moderate. The sewing and case construction steps require patience and precise measurement, but no specialized skill. Most people produce a noticeably better second book than their first.
POD comparison: a single printed hardcover from a POD service typically costs $15–$35 depending on page count and finish, with no time investment beyond uploading a file. For one or two copies, the cost difference is small. For ten or more copies, POD is almost always faster and cheaper per unit than DIY.
Pre-production checklist: what to verify before you print a single sheet
Pre-production is where most DIY projects succeed or fail. A single missed setting in the PDF can mean reprinting the entire interior. Run through this checklist before committing to a full print run.
File readiness
- All images are 300 dpi at the final print size (not screen resolution or "effective" resolution after scaling up).
- All fonts are embedded or converted to outlines in the exported PDF.
- Color mode matches your printer: CMYK for inkjet, RGB or CMYK for laser.
- Bleed is set to 0.125" (3 mm) on any edge that extends to the trim.
- Gutter margin is at least 0.75" on every page spread.
- Page size in the PDF matches your intended trim size exactly.
Print readiness
- You have printed and folded one complete test signature and confirmed page order is correct.
- Registration on the test signature is within 1/16" front-to-back.
- Text and images sit clearly inside the trim marks with no content cut off.
- Paper weight is at least 24 lb (90 gsm) for the interior.
Most common file errors to catch
- Images placed at screen resolution (72–96 dpi) that look sharp on screen but print blurry.
- Fonts not embedded, causing substitution on the printer's RIP.
- Gutter set to the same width as the outer margin, causing text to disappear into the binding.
- Page count not divisible by four, leaving blank pages at the end of the last signature.
Pro Tip: Always produce one complete proof book before printing multiple copies. Bind it loosely with binder clips, read through every page, and check margins, image quality, and page order. Fixing a file error costs you one book's worth of paper; skipping the proof can cost you an entire print run.
A parent's honest take on handmade books versus buying one
There is something genuinely satisfying about handing a child a book you made yourself. The weight of it, the cloth cover, the pages you folded and sewed. That feeling is real, and it is worth something.
But it is worth being clear-eyed about the time commitment. A first hardcover keepsake will take most parents a full weekend, not a Saturday afternoon. The drying time alone spans 24 hours, and that is after you have already spent several hours printing, folding, sewing, and building the case. If you are making one book as a meaningful, one-of-a-kind gift, that investment makes sense. If you are hoping to produce five copies for grandparents by next Friday, you will likely be disappointed.
The scope question matters too. One highly polished keepsake, made carefully and pressed properly, will look and feel like a real book. Five rushed copies will show the shortcuts. Pick one and do it well.
The learning curve is real but short. Most people find the second book takes half the time of the first, and the results are noticeably better. The skills transfer: once you understand grain direction, hinge gaps, and how PVA behaves, every subsequent project gets easier. If you are a parent who enjoys making things, this is a craft worth learning. If you want the result without the process, there are faster routes.
Want a print-ready file without the layout work?
If the DIY process sounds like more than you want to take on right now, but you still want a personalized hardcover book starring your child, Adventuresofbook offers a direct alternative. For $14.99 one-time, you get a 13-page, 8.5"x8.5" print-ready PDF built around your child specifically: original illustrations generated from photos you upload, an original story (not a template with a name swapped in), and a file sized for home printing or professional printing services.

The PDF arrives in about five minutes. You can print it at home using the steps in this guide, or order a printed hardcover directly through the service. There is a 7-day refund policy if the result is not what you expected. It is designed for one child per book, which means the story and illustrations are built around that specific child, not a generic character.
If you want to skip the file-prep stage and go straight to printing, create your child's book here.
Sources
These resources are worth bookmarking before you start your project.
- How to Print a Hardcover Book at Home (Step-by-Step Guide) - Gobook Printing
- Printing and binding your own books — Carissa Pluta (substack)
- How to Print and Bind a Book : 9 Steps (with Pictures) - Instructables
- Own Your Book Press – DIY Guide to Book Printing: How to Print, Trim and Bind Your Books
- Tuxgraphics book-binding primer
FAQ
Can you really print a hardcover book at home with a regular printer?
Yes. Most home inkjet or laser printers can handle 24–32 lb bond paper, which is the standard weight for a DIY text block. The key constraints are gutter margin (minimum 0.75"), image resolution (300 dpi), and whether your printer supports duplex printing.
How long does it take to make one hardcover book at home?
Plan for 4–7 hours of active work spread across at least two days. The 24-hour pressing and drying period is non-negotiable for PVA glue to cure properly.
Is sewn binding or glue binding better for a children's book keepsake?
Sewn signatures are more durable and open flatter, making them the better choice for a keepsake that will be read repeatedly. Glue-based perfect binding is faster but more likely to fail with heavy use.
What is the minimum gutter margin for a home-printed hardcover?
The minimum recommended gutter is 0.75" from the spine edge to the nearest text or image. Pages lose roughly 0.25"–0.375" of the inner margin to the binding, so anything less risks text disappearing into the spine.
What if I want a personalized hardcover without doing all the layout work myself?
Adventuresofbook generates a 13-page, 8.5"x8.5" print-ready PDF with original illustrations from your child's photos for $14.99 one-time, in about five minutes. You can print it at home using the steps in this guide or order a printed hardcover directly through the service at adventuresofbook.com/create.